
What Students Will Learn
Students will learn:
- How AI can detect hand points using a camera
- How to use hand gestures to control a project
- How to move a sprite using finger position
- How to draw using the Magic Pen extension
- How to clear drawing using a gesture
- How to move drawing using hand control
Required Things
- Laptop or computer with camera
- MadBot AI Studio
- MadBot Pose AI extension
- Magic Pen extension
- One ball sprite
- Internet connection
Project Idea
In this project:
| Gesture / Action | Result |
|---|---|
| Right hand index finger moves | Ball follows the finger |
| Left hand open palm | Pen goes down and starts drawing |
| Left hand not open | Pen goes up and stops drawing |
| Left hand rock sign | Clears the drawing |
| Right hand OK sign | Moves the drawing |
Step-by-Step Tutorial
Step 1: Open MadBot AI Studio
Open MadBot AI Studio and create a new project.
Delete the default sprite if needed and add a ball sprite.
Step 2: Add Required Extensions
Click on the extension button and add:
- MadBot Pose AI
- Magic Pen
These two extensions will help us detect hand gestures and draw on the screen.
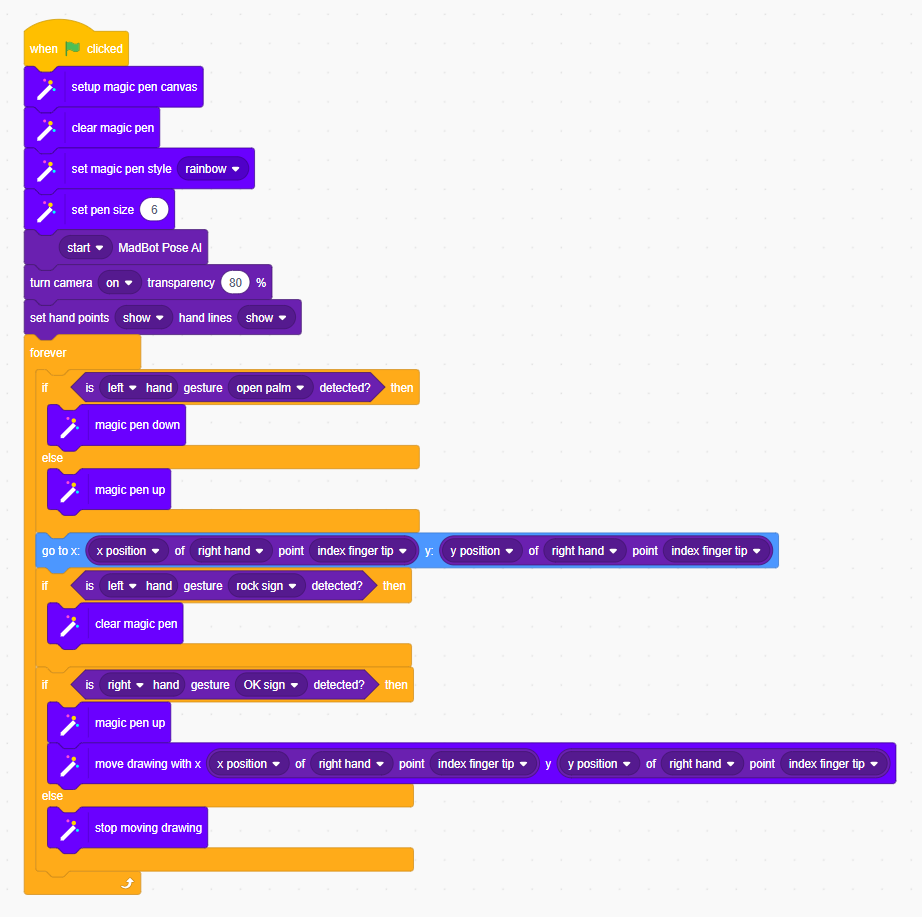
Step 3: Setup Magic Pen
When the green flag is clicked, first setup the Magic Pen canvas.
Use these blocks:
setup magic pen canvasclear magic penset magic pen style to rainbowset pen size to 6
This will prepare the drawing area and set the pen style.
Step 4: Start Pose AI and Camera
Now start the Pose AI extension and turn on the camera.
Use:
start MadBot Pose AIturn camera on transparency 80%
The camera will detect your hand position and gestures.
Step 5: Move Ball with Right Hand Index Finger
Inside the forever loop, move the ball sprite to the position of the right hand index finger tip.
Logic:
The ball’s X position follows the X position of the right hand index finger.
The ball’s Y position follows the Y position of the right hand index finger.
So when you move your right index finger in the air, the ball will also move on the screen.
Step 6: Start Drawing with Left Hand Open Palm
Now we will use the left hand as a drawing control.
If the left hand open palm gesture is detected, then the pen will go down.
That means drawing will start.
If the open palm is not detected, then the pen will go up.
That means drawing will stop.
Step 7: Clear Drawing with Rock Sign
To erase everything, we use the left hand rock sign.
If the left hand rock sign is detected, then the Magic Pen will clear the drawing.
This works like an eraser or reset gesture.
Step 8: Move Drawing with Right Hand OK Sign
If the right hand OK sign is detected, then the drawing will move with the right hand index finger.
If the OK sign is not detected, then the drawing will stop moving.
This makes the project more interactive.
Final Result
Now your project is ready.
You can:
- Move the ball using your right hand index finger
- Draw in the air using your left hand open palm
- Stop drawing by closing or changing your left hand gesture
- Clear the screen using left hand rock sign
- Move the drawing using right hand OK sign
This project is a great example of how AI, hand tracking, and coding can be combined to create interactive projects.