
Face Filter Project using MadBot AI Studio
Make Digital Glasses Appear on Your Face
In this project, we will create a simple AI Face Filter using MadBot AI Studio. When the user clicks on the green flag, the camera will turn on, the AI will detect the face, and a glasses sprite will automatically appear on the user’s face.
This project is similar to fun filters used in apps like Instagram and Snapchat.
What You Will Learn
By making this project, students will learn:
- How Face AI detects a human face
- How to use the camera in MadBot AI Studio
- How to place a sprite on the face
- How to resize a sprite according to face size
- How AI can be used to create smart visual effects
Requirements
To make this project, you need:
- MadBot AI Studio
- Face AI Extension
- Camera/Webcam
- Glasses Sprite
Step 1: Add Face AI Extension
First, open MadBot AI Studio and add the Face AI Extension.
This extension helps the computer detect a human face using the camera.
Step 2: Add Glasses Sprite
Now add a Glasses sprite.
This sprite will be placed on the user’s face when the face is detected.
Important:
Make sure the center point of the glasses sprite is in the middle of the glasses. This helps the glasses fit properly on the face.
Step 3: Start the Face AI and Camera
Use these blocks when the green flag is clicked:
when green flag clicked
initialize face AI
turn camera on transparency 0%
set face box off
Explanation:
initialize face AIstarts the Face AI systemturn camera onstarts the webcamtransparency 0%makes the camera clearly visibleset face box offhides the face detection box so the project looks clean
Step 4: Detect the Face
Now we will check whether a face is detected or not.
Use a forever loop because the face position keeps changing in real time.
forever
    if face detected?
        show
    else
        hide
Explanation:
- If the face is detected, the glasses will show
- If no face is detected, the glasses will hide
Step 5: Move Glasses on the Face
To make the glasses appear on the face, move the glasses sprite to the face position.
Use:
go to x: face 1 nose x
      y: face 1 left eye y
Explanation:
face 1 nose xgives the center position of the faceface 1 left eye yhelps place the glasses near the eye level
Step 6: Resize the Glasses
Now set the size of the glasses according to the face width.
Use:
set size to face 1 width %
Explanation:
When the user comes closer to the camera, the face becomes bigger, so the glasses also become bigger.
When the user moves away, the glasses become smaller.
Final Block Logic
The final logic will look like this:
when green flag clicked
initialize face AI
turn camera on transparency 0%
set face box off

forever
    if face detected?
        show
        go to x: face 1 nose x
              y: face 1 left eye y
        set size to face 1 width %
    else
        hide
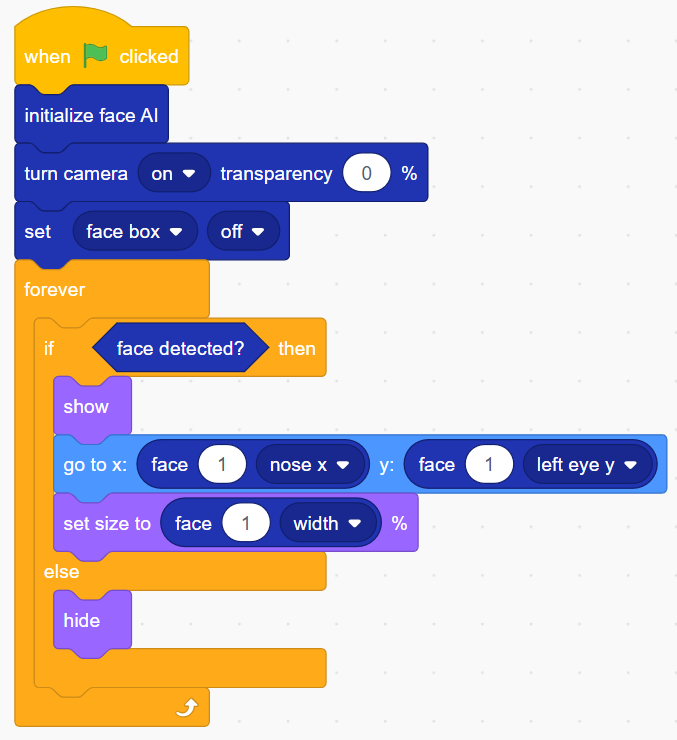
Output
Now click on the green flag.
The camera will turn on, Face AI will detect your face, and the glasses sprite will appear on your face. When you move your face, the glasses will also move with you.
Troubleshooting
If the glasses are not fitting properly, try these changes:
- If glasses are too low, increase Y position by +10 or +20
- If glasses are too high, decrease Y position by -10
- If glasses are too big, reduce the size
- If glasses are too small, increase the size
- If glasses are not centered, adjust the costume center point
Real-Life Connection
This project shows how AI face filters work in real life. Apps like Snapchat, Instagram, and video call filters use similar technology to detect the face and place digital objects like glasses, hats, masks, or stickers.
With MadBot AI Studio, students can learn the same concept in a simple block-based way.
Project Idea Extension
After completing this project, students can also try:
- Hat filter
- Mask filter
- Moustache filter
- Crown filter
- Funny face sticker
- Animal face filter
This makes the project more creative and fun.
Conclusion
In this project, we created an AI-based face filter using MadBot AI Studio. We used Face AI to detect the face and placed a glasses sprite on the user’s face in real time.
This is a fun beginner-friendly project to understand how AI, face detection, and visual effects work together.